Inbound Number Portal Knowledge Base
Learn How to Manage Your Number, Implement Call Tracking and Access Valuable Insights.
To modify the call flow of an inbound number, please follow the below steps.
- Click on Numbers in the left-hand menu.
- Click on the number name to access the routing.

- If the call flow is not showing, select Call Routing tab in the number details pane

- Enter the destination number where calls will be received

- Toggle the switches on/off to activate or deactivate a feature.

The available features are:
Call Recording (including call recording preamble) - If the field is left blank or no custom recording is uploaded, the Business1300 professional recording will be used by default. Click on the play button to preview the recording.
Timeout - The number of seconds (between 5 and 60) before a call is considered unanswered. If voicemail is enabled, it will be played after this timeout. The default timeout if this is not activated is 25 seconds.
Call Whisper - This message will be played to the destination handset immediately when answering a call.
Voicemail and Call Alerts - Enter the URL of a hosted MP3 file.
You can also select whether you want to receive missed call alerts, all call alerts or not receive alerts at all. You can enter as many email addresses or mobile numbers as you like.
To remove an email recipient or SMS recipient, click on the contact email or phone number.
- You can also activate advanced features 🌶️ by toggling the buttons on in the top right.

The available features are:
Friendly/Branch Name - A descriptive name for your call flow or answer point location. For example, "head office". Useful to identify a call flow if you're sharing routing between numbers.
Force Caller ID - Override the caller ID displayed on the destination handset with any inbound number on your account. This is useful to quickly identify that an incoming call is from your tracking number. This will not affect the Caller ID shown in the Calls reports.
Share Call Flow - Replace the call flow of the current number with another tracking number in the same account. If the current call flow is shared, you can create a new call flow for this tracking number only.
- Click Save.
The Advanced Call Flow builder allows you to create complex routing configurations quickly and easily using our drag-and-drop interface.
Getting Started
To start building or updating an advanced call flow, please follow the below steps:
- Click on Numbers in the sidebar.
- Click on the number name to access the routing.

- Select Advanced Call Flow in the number details pane.
Understanding the Advanced Call Flow builder interface
If you are starting to build new a call flow from scratch, the Advanced Call Flow builder starts with two mandatory, default call flow actions on the canvas: call start (![]() ) and call hangup (
) and call hangup (![]()
).
If you are editing an existing call flow, the call flow for your tracking number will be shown on the canvas.
The grey line between the actions indicates the direction of flow of an incoming call.
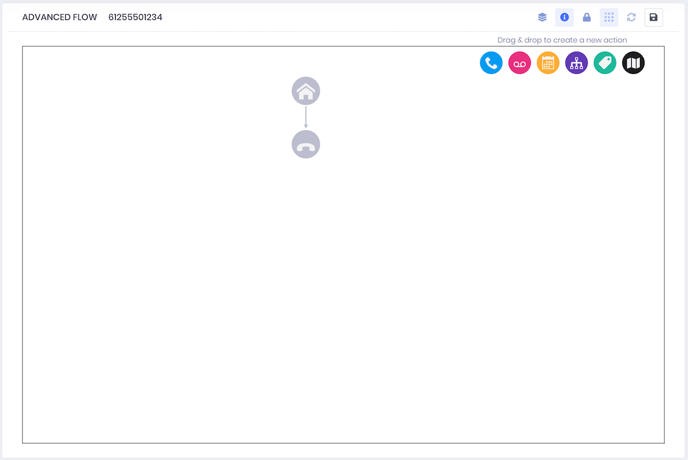
Call flow actions
Available call flow "actions" for configuration are shown in the top right hand corner of the canvas.
| Action | Action Name | Description |
| Transfer | Transfer incoming calls to an answer point. | |
| Voicemail | Allow the caller to leave a voicemail and configure missed call alerts to be sent to relevant parties by email and/or SMS. | |
| Time Routing | Filter calls to the next action by time of day and day of the week. | |
| IVR/Menu |
Offer callers an IVR menu with a number of options to route them through to the right department for their needs. |
|
| Tag |
Assign a smart tag to calls that pass this action in the call flow. Please note: This is not required for IVR menus, as they tag automatically based on the selections. |
|
|
Location Routing |
Transfer callers to the right location based on the caller's exchange (landlines) and/or mobile location (mobile calls to 13, 1300 or 1800 services only). |
The Calls report, sometimes called the Call Log, is where you can see detailed information on individual calls. Here you can listen to call recordings, add notes, score a call or add tags to classify an interaction.
- Overview
- Tagging, scoring and adding notes to calls
- Filtering the call log
- Viewing the customer journey
- Exporting the call log
If you're using our call intelligence transcription power up, you can also get instant summaries of your calls straight from the call log.
Overview
Select Calls from the sidebar.
The call log will show you high level information on all calls into your business as well as the online channel they are attributed to.
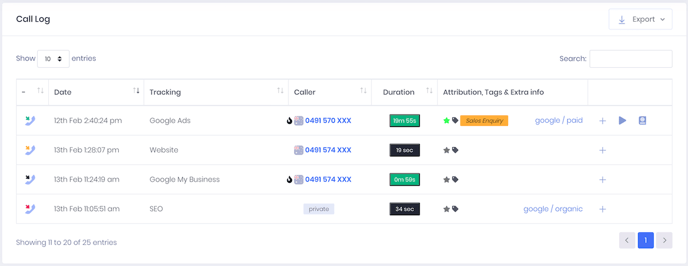
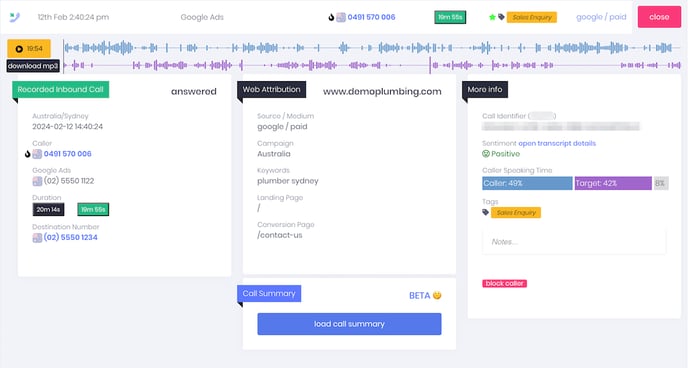
Click the + icon on a call to see detailed information about an individual call:
You can hover over a caller's number and click Customer Journey to view the customer journey report:

Web Attribution
If the call was made to a dynamic number on your website, you will also have the Web Attribution information available to discover where your phone leads are coming from and attribute conversions back to the correct digital marketing channel:
- Source: The Web Source of the caller's website session i.e. Google, Bing, etc
- Medium: The Web Medium e.g. CPC, organic, referral, direct
- Keyword: The keyword(s) the caller searched for in the search engine that triggered the ad.
- Campaign: The campaign of the session
- Landing: The page the user landed on when they visited your website
- Conversion: The page the user was on when they initiated the call on your website
Tagging, scoring and annotating calls
Calls can be tagged or scored manually in the call log, as well as automatically based on caller behaviour or call data using Smart Tag or based on keywords spoken using Call Intelligence Spotlights Power Ups.
Tagging a call
You can add tags to a call by clicking the tag icon. If you have previously used a tag, you can select it from a drop down list.
To manage the list of tags, go to to Power Ups > Smart Tag and look under "Generic Tags without group":
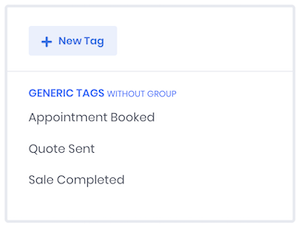
Scoring a call
You can score a call by clicking the score (★) icon in the call log and selecting a rating:

Adding a note
You can also add freeform notes to individual calls to add extra context to your conversations:

Filtering the call log
You can filter the call log by account, tracking number, tracking source, call status and date range.
Account
Select the account or accounts you wish to view from the account selector.

After you've selected the account(s), click "apply". If you want to select all sub-accounts, select the parent account and click "include sub accounts".
![]()
Tracking Number, Call Source or Call Status
Click Add Filter and select the filter you would like to apply. You can add as many filters as you need.
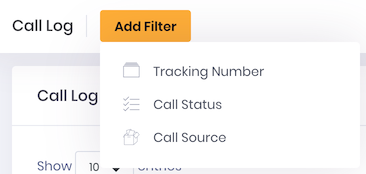
Filtering by Call Source allows you to search by the source name or part of the source name. For example, if you enter "Google", it will show calls to numbers called "Google PPC", "Google SEO" and "Google My Business".
![]()
Click the 🔄 icon to apply the filter.
Date Range
The reporting period can be updated through the date range selector.

Customer Journey
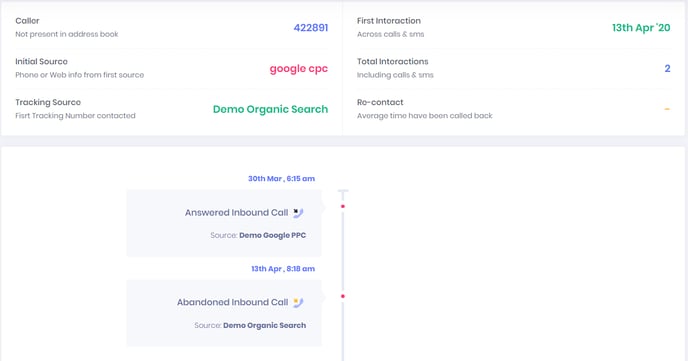
If a caller has called before, you can hover over a number and click Customer Journey.

The customer journey will show you all the interactions between this caller and the business:
Exporting the call log
To generate a detailed report in Excel, CSV, PDF, or have it printed, sort the list by using the filter options then click the Export button.

To swap out a number dynamically on your website, you will need to configure Dynamic Number Insertion for the channel(s) you're looking to track.
You can it up by following these steps:
- Click Dynamic Insertion in the main menu

- Select the website domain. If you haven't set up a website yet, set it up by clicking + Configure a new website

- Click + Add Number
- Select the medium you would like to track from the list (Tip: if you need to use a custom medium, type it in the text box and then select it from the list)
- Select the source you would like to track from the list (Tip: if you need to use a custom source, type it in the text box and then select it from the list)
- If you need to swap numbers based on the UTM campaign or keywords, you can toggle Advanced to enter this information.

- Enter the number on the website to be replaced
- Select the inbound number to be shown from the list
- Click Confirm
- Then click Save
- Once saved, click on the Snippet tab to get the unique tracking code for your website
- Click on the tracking code to copy it to the clipboard
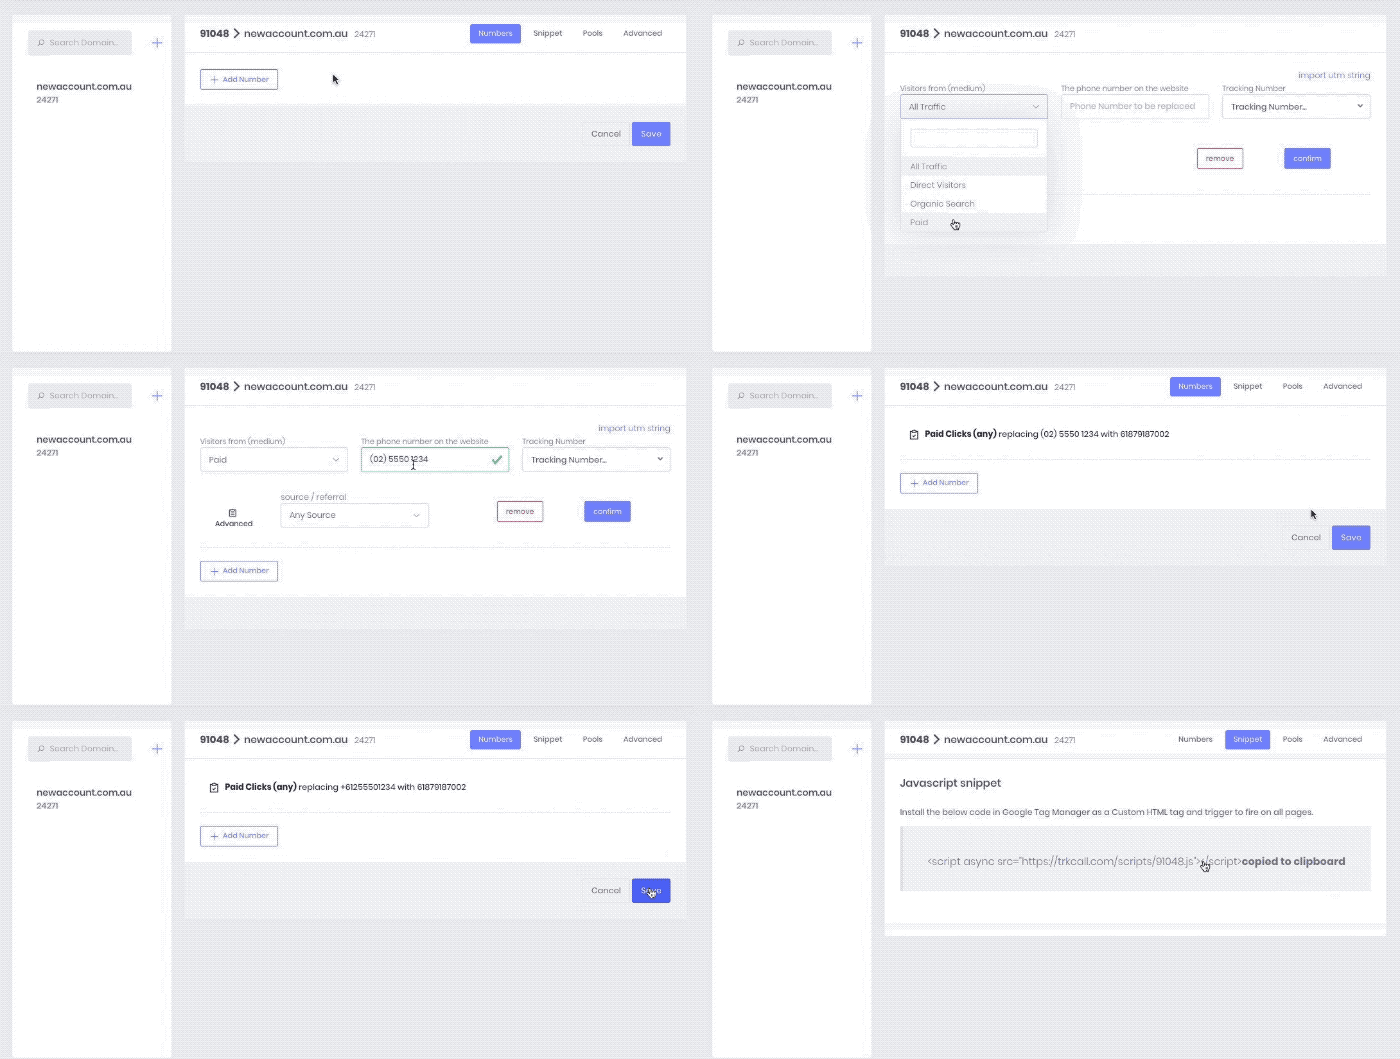
Once the Dynamic Number Insertion is configured and the script is installed, the phone number on the website will be replaced with the Business1300 inbound number based on the configuration.
The Business1300 tracking code needs to be installed on your site in order to start tracking online calls. The quickest and easiest way to install the Business1300 tracking code is using Goole Tag Manager.
Getting your WildJar tracking code
You can find the Business1300 tracking code in the dashboard.
- Go to Dynamic Insertion in the main menu
- Click on the website domain
- Click on the Snippet tab
- Click the code to copy it to the clipboard

Adding the Business1300 tag to your GTM container
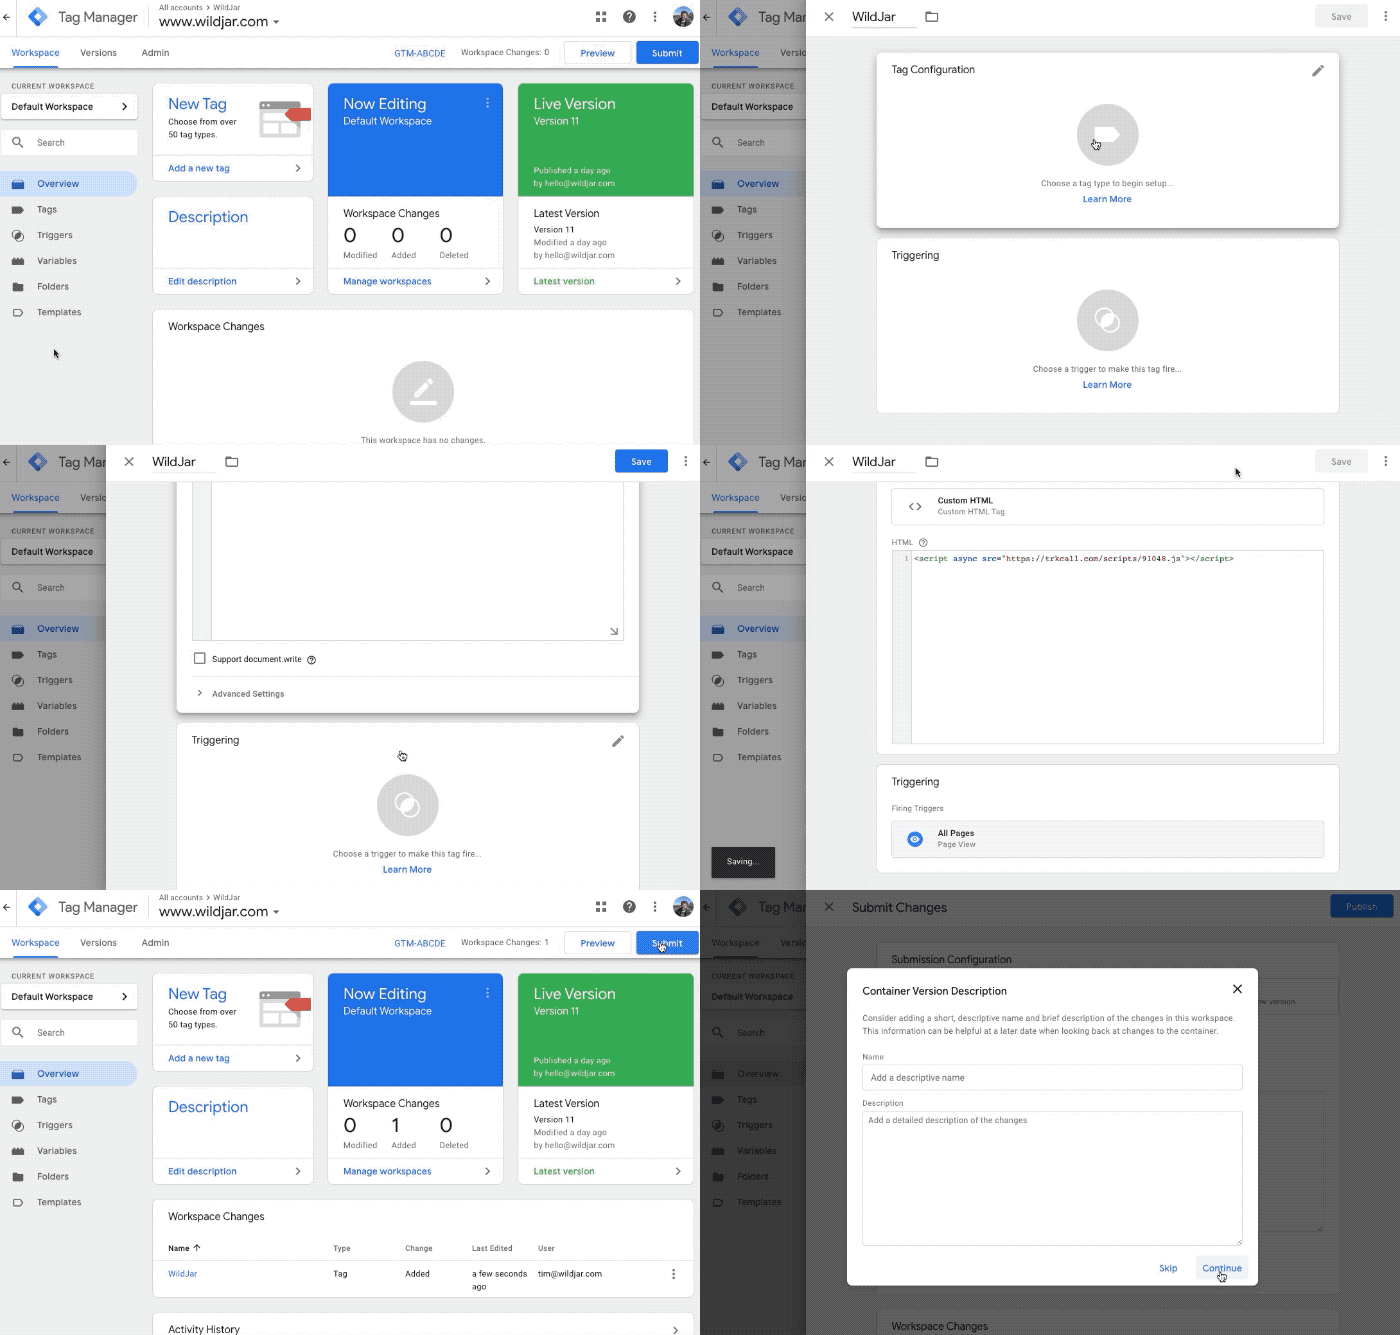
- Log into your Google Tag Manager account and select your container
- Click New Tag

- Name your tag with something descriptive, like Business1300, and click the Tag Configuration section

- Choose Custom HTML under Custom as the tag type

- Paste the Business1300 tracking code from the Dynamic Insertion configuration for your site.
You can find it in the dashboard by going to Dynamic Insertion > click on the website domain > click on the Snippet tab. Click the code to copy it to the clipboard. - Paste it into the HTML text box in GTM.
- Click the Triggering section and select All Pages

- Click Save in the top right corner
- On the main workspace screen, click Submit and then Publish
Need Some Help Getting Set Up?
Get in touch with our team on 1300 00 1300 and we will happily assist. Alternatively, you can submit a support request and our Customer Care Team will be in touch within 1 business day.


